

How To Make A Hair Rig For Fishing
 The apprehensive hair rig! It doesn't matter what your chosen angling field of study is, the hair rig will feature at some betoken. Match anglers, river anglers, carp anglers, all use the hair rig and despite its age, in some situations it is still the all-time way to present your allurement. We asked our rig tying adept Wayne Box to run through the tying of the pilus rig and give us a few tips and tricks! I nonetheless apply the bog standard hair rig in a lot of my angling, both for large carp using conventional carp line-fishing tactics and also in my commercial friction match fishing ready ups but for the benefit of this tutorial I volition testify you how to tie a standard hair rig on some united nations-coated braid, we will expect at taking information technology onto the next levels later. Firstly, the items you volition need to make the rig;
- sharp pair of scissors (ever get an adult to help if need exist)
- braided hooklink cloth
- wide gape way hooks
- a standard baiting needle (useful for helping to pull knots through)
- Hair stops
- Tungsten putty
- Hookbait of your pick
As you can see the components for this rig are very uncomplicated but don't be fooled into thinking this rig is simply for uncomplicated line-fishing, many big carp still get defenseless on this type of rig every day of the week!
Step 1 Cutting your complect to size
We are looking for most 12 inches of braid, if you don't have a measuring device and so information technology is roughly the length of your forearm. We are looking for an overall rig length of about 8 inches simply requite yourself enough to work with. 
Step two Make the hair
This is the trickiest part, you need to grade an overhand loop in one cease of the complect, a top tip is to just moisture the stop the last few inches of the complect in your mouth get-go, to help the complect fibres stick together and stop the fraying. the loop needs to be every bit small equally yous tin go it, ideally it will exist slightly smaller than the size of the bait you are using. Take your time and if yous are struggling then utilise the baiting needle to pull the loop through the overhand knot. 
Footstep three Trim the tag terminate off
When rig tying, the tag end is the bit of hooklink textile that we don't need after we have tied a knot. Then in this case, it is the curt piece of braid left over when we formed our hair. Trim it down to leave a couple of millimetres in instance the loop slips slightly. Now you should have a length of braid with a pocket-sized loop in one end. 
Step 4 Add your hookbait
For those new to tying rigs it is best to add your hookbait at this indicate as information technology will brand deciding the length that the hair needs to be a whole lot easier. Simply slide your bait onto the baiting needle ensuring the needle goes through the heart of the bait. And so, place the loop of the pilus you merely made onto the baiting needle and claw it into the take hold of at the terminate of the needle similar this. Simply slide the bait off the needle and onto the hair pulling it far enough forth to betrayal a good few millimetres of the loop. Finally slide a allurement stop into the loop and pull the bait downwards so the finish sits snugly against your chosen allurement, the stop will preclude the allurement being pulled off on the cast or once its out there on the lake bed. You lot should now accept a length of braid with your chosen bait fastened to the loop and fixed in place with a hair end. 
Southward tep v Attaching the hook
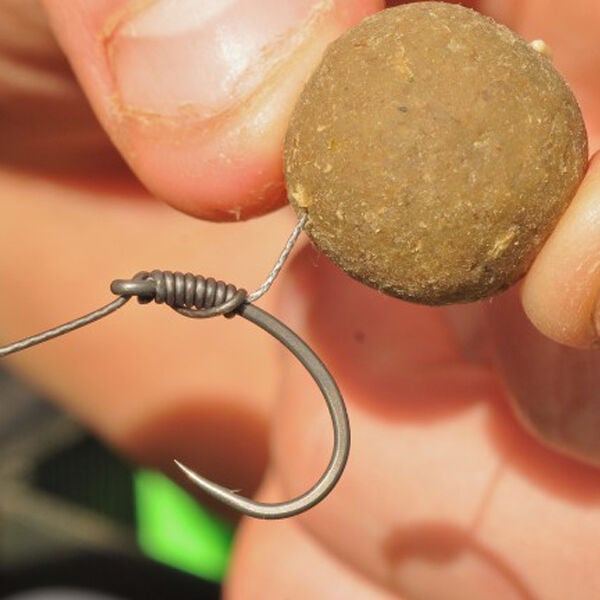
Accept concord of your chosen hook and pass the end of the braid without the loop in it, through the eye of the hook from the back. It is vital to brand sure the braid goes through the back of the claw (away from the claw point). You should now have the claw on the braid but it is not fixed in position so nosotros need to tie what is called a knotless knot. Firstly, slide the hook down the complect until it almost touching your hookbait, you lot should leave a 5mm gap then the bait can move freely. Now, concur the hook in your left mitt and wrap the braid effectually the claw starting at the superlative near the eye, always tie the know abroad from the point where the heart is formed, await closely and yous will meet there is a weld where the eye has been formed, we desire to avoid tying the knot confronting it, you can see what I mean in the picture beneath. Tie seven turns then pass the complect dorsum through the eye of the hook the same mode you passed it through when putting the hook onto the braid at the get-go. Pull the knot tight and make sure the hair is coming off the back of the hook and hasn't twisted round. It should at present look like this..... 
Footstep vi - Attaching to your atomic number 82 setup
You tin tie the rig direct to your chosen lead but a far easier way is to apply a quick link and a figure of 8 knot. Y'all tie a figure of eight knot exactly the same way as an overhand knot merely just with an extra plow of the loop. Utilize a pulla tool to tighten the knot, always moisten your knots don't forget! Once more trim the tag cease and that is the figure of 8 loop done! 
Step seven Last Touch on
Once the rig has been in the h2o a while the complect takes on water and sinks perfectly only to aid this procedure I ever add a slice of tungsten well-nigh an inch down from the hook, this helps to pull the hook downwardly and catch in the fishes mouth. For added attraction you tin can add at this stage, a small golf brawl sized PVA mesh pocketbook of matching pellets, nick the hook point through the bag, twist one time and so hook through again to ensure your bag stays on the hook. In one case you lot have washed that the rig is finished and ready to cast out into the lake!  Although this is a basic hair rig set up it notwithstanding catches thousands upon thousands of carp every year! Requite it a try.......... We will look at incorporating the hair section into a few other rigs another time, merely for now get tying those rigs and don't forget practise makes perfect! You lot tin email me with any rig questions [electronic mail protected]

How To Make A Hair Rig For Fishing,
Source: https://www.total-fishing-tackle.com/blog/how-to-tie-a-hair-rig-total-fishing-rig-school
Posted by: brownonsing.blogspot.com
0 Response to "How To Make A Hair Rig For Fishing"
Post a Comment